What is a drawing sheet?
A sheet is your drawings made ready to print: a page of a specific paper size with a frame, a title block, and a scale. One sheet can hold a single floor plan, or a section, elevations, a 3D view, and a room list can sit side by side. Several sheets together form a sheet set: ground floor plan, upper floor plan, sections, elevations…
Drawing sheet paper sizes: A4 to A0
Sheets are drawn on ISO 216 A-series paper. Each size is double the one before it; A3 is two A4s, and A1 is four A3s.
| Size | Size (mm) | Used for | Nodaform |
|---|---|---|---|
| A4 | 210 × 297 | Single room, small apartment, listing plan | Free |
| A3 | 297 × 420 | Apartment or single-floor plan, presentation | Free |
| A2 | 420 × 594 | Plan, section, and elevation together | Plus |
| A1 | 594 × 841 | Jury sheet, large project presentation | Plus |
| A0 | 841 × 1189 | Multi-storey building, large site plan | Pro |
When choosing a size, check whether the drawing fits on the paper at the scale you chose. Account for the margin and the title block too; the usable area is smaller than the paper itself.
How to choose a drawing sheet scale
Scale tells you how many real units one unit on paper stands for. At 1:100, 1 cm on paper is 1 m in reality. Common uses:
- 1:50: detailed floor plans, bathroom and kitchen layouts, drawings where dimensions need to be easy to read.
- 1:100: the general plan of an apartment or house, sections, and elevations.
- 1:200: plans of large buildings, small sections and elevations that need to fit on the same sheet.
- 1:500: the site plan showing the lot and its surroundings.
The math is simple: paper size (mm) = real size (m) × 1000 ÷ scale. A house 12 m wide takes up 120 mm at 1:100 and 240 mm at 1:50. A3 landscape paper is 420 mm wide; with 10 mm margins, 400 mm of usable width remains. So this house fits on an A3 sheet by itself at 1:50, but if you want to put a section next to it, you'll need to go down to 1:100 or move up to A2.
In Nodaform you can choose the sheet scale from 1:20, 1:50, 1:100, 1:200, and 1:500, or pick “fit to paper.” If the plan doesn’t fit the box at the scale you chose, the editor warns you and suggests a scale that fits. Each box can also have its own scale: plan at 1:50 and section at 1:100, for example.
What is a title block, and what goes in it?
The title block is the sheet’s ID; it usually sits at the bottom right or as a strip along the bottom. Whoever picks up the sheet can tell what they are looking at from it. Commonly it includes:
- Project name and sheet name (e.g., “Ground floor plan”)
- Scale and date
- Sheet number and the total number of sheets in the set (e.g., A-01 / 05)
- Drawn by, checked by, and revision letter
- Firm or school name, logo
Nodaform has three title block layouts: a bottom strip, a slim single-line title block, and a right column. You can add and delete rows, reorder them, and choose a logo, font, and frame thickness; you can save a title block you like as a template and use it in other projects too (title block editing is Plus). The title block fills in details like scale and date by itself.
Sheet layout: placing the plan, section, and elevations
On a sheet, each view is a box. A few rules for a good layout:
- Put the most important drawing in the biggest box. The floor plan takes up most of the sheet, with the section and elevations beside it.
- Align. When the box edges line up, the sheet looks tidy. If the section is at the same scale as the plan, the levels and walls can be read across when they sit side by side.
- Give every box a title and a scale. Something like “Section A–A · 1:100”; this is a must when the same sheet has different scales.
- North arrow and scale bar. The north arrow shows the orientation of the plan; the scale bar shows the correct dimension even in a reduced print.
- Leave space. Boxes shouldn’t overlap; leave some breathing room between the title block and the drawings.

In Nodaform, the Sheet editor opens full screen. You drag a view from the palette on the left onto the sheet, or just click it; you grab a box to move it and resize it from an edge or corner. While you move, edges snap to the other boxes and to the center of the sheet, and the snap line is shown. The arrow keys nudge a box 1 mm, or 5 mm with Shift; undo with Ctrl+Z. A sheet can hold up to 12 boxes.
Boxes unlock by plan: floor plan, room list, area summary, project title, and note are open to everyone; section, elevation, 3D, MEP plan, and tables are Plus; evacuation plan and quantity take-off summary are Pro; voltage summary is Ultimate.
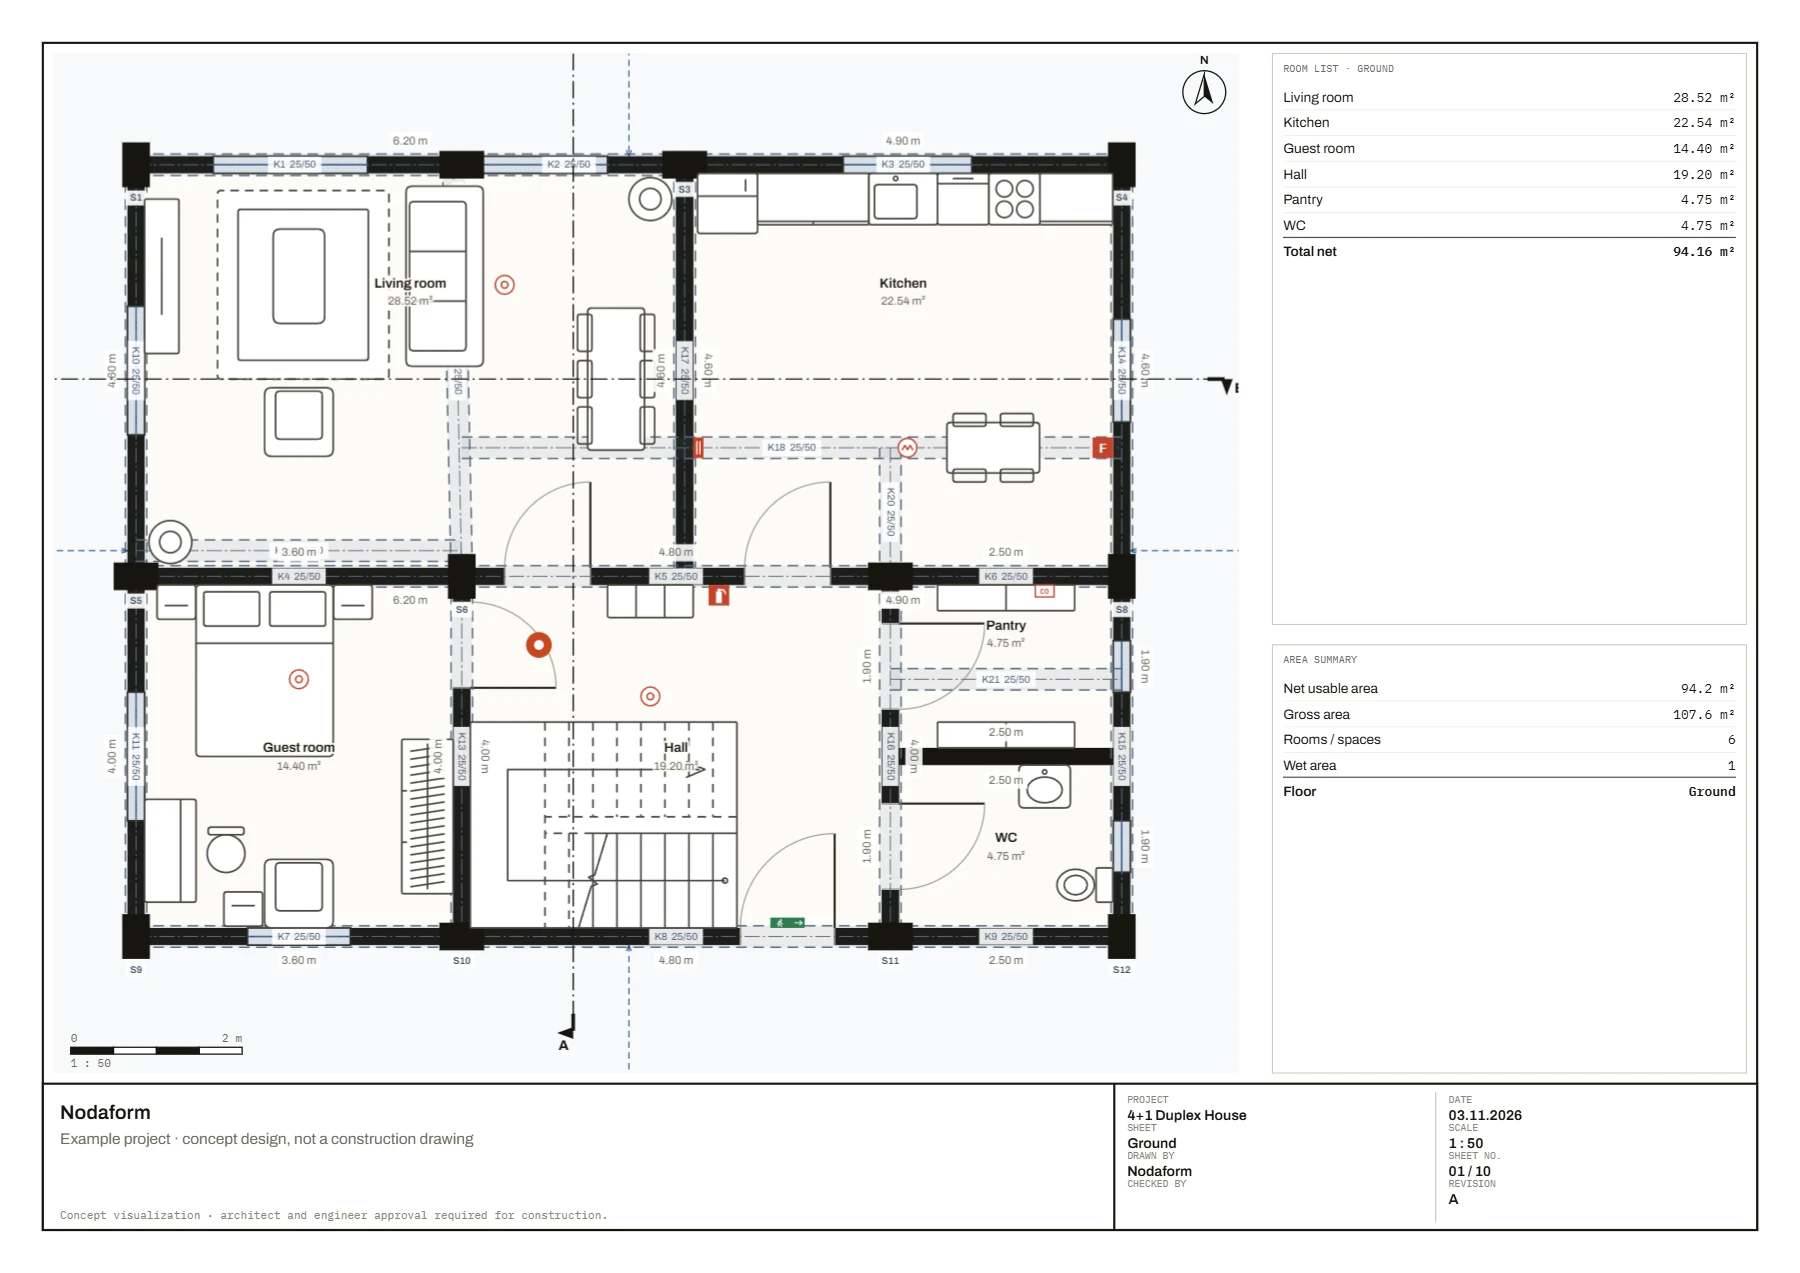
Sheet sets and sheet numbers
If you have more than one sheet, give each a number and write the set’s total in the title block: A-01 / 05, A-02 / 05… That way a missing sheet is noticed right away. In common practice, the prefix shows which discipline the sheet belongs to: A for architectural, S for structural, E for electrical.
In Nodaform you can give sheet numbers a prefix of up to 6 characters and reorder sheets with the arrows; the numbers and the “01 / 05” in the title block update automatically. The Free plan allows 3 sheets per project, Plus allows 10, and Pro and Ultimate have no limit. The duplex in our example project is a 10-sheet set: floor plans, electrical installation, sections, elevations, structural system, presentation sheets, and evacuation plans.
How to make a jury sheet
The sheet architecture students bring to a jury is usually A1 and explains the project on a single page: a title, floor plans, at least one section, elevations, a 3D view, and a short description. When the plans are at the same scale, it’s easier to compare floors.
The Jury sheet layout in Nodaform sets this up in one click: A1 landscape, 1:100, slim title block; in a two-storey project, two plans side by side at the same scale, a section (or the west elevation if there is none), the south and east elevations, a 3D view of all floors, a room list, and a note box. Then you can move and change the boxes however you like.
Exporting a PDF without breaking the scale
The whole point of a sheet is to be printed at the correct scale. To make that happen:
- Use a vector PDF. Lines don’t blur when you zoom in, and text stays sharp. In Nodaform, PDF sheets are Plus; getting all sheets as a single PDF file is Pro.
- When printing, choose “Actual size” or “100%.” If “Fit to page” is selected, the printer shrinks the sheet slightly and 1:100 is no longer 1:100. The scale bar still shows the correct dimension even then.
- Use the same paper size as the PDF. If you print an A1 sheet on A3, the drawing shrinks to half size and 1:100 becomes 1:200; in that case, trust the scale bar, not the scale in the title block.
- If you’ll continue in CAD, get the DXF. The sheet DXF comes in millimeters (Pro).
PNG output is 150 dpi with a Nodaform signature on the Free plan, and 300 dpi without a signature on Plus; resolution information is written into the file, so the scale comes out right when you print at 100%.
Drawing sheet checklist
- Paper size and scale suit the drawing, and the drawing fits its box
- The title block has the project name, sheet name, scale, date, and sheet number
- Every box has a title and a scale
- North arrow and scale bar are on the plan
- Boxes are aligned and don’t overlap
- Sheet numbers are in order and the total is correct
- The PDF is printed at “Actual size / 100%”
The plans and dimensions in this post are layout ideas. A building permit, structural design or construction project requires a design by, and approval from, a licensed architect and engineer; ask your municipality about the details of the regulations.